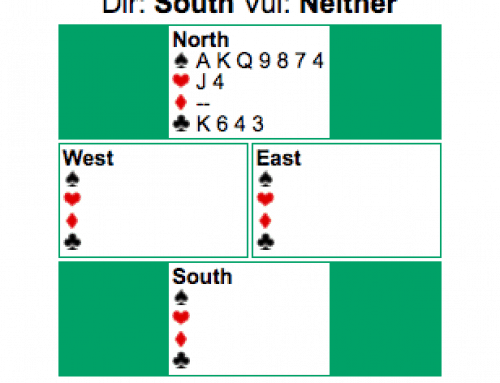
Larry Dawson (Woofie) tells about his partner, Jogs, who found a brilliant duck.
Dlr: South Vul: Both IMPs �
North A K J 10 5 3 5 2 10 3 K 10 3
West 8 4 8 7 4 9 8 6 5 4 A Q 7
East Q 7 2 Q 10 3 A J 7 9 6 4 2
South 9 6 A K J 9 6 K Q 2 J 8 5
West
North
East
South
—
—
—
1
pass
1
pass
1NT
pass
3NT
all pass
After winning the diamond opening lead with the king, declarer led the� 9 and passed it. Jogs ducked! Now declarer could take six spade tricks by cashing, but of course he didn’t if a finesse works once it should work twice. So declarer took another spade finesse, but this one didn’t work! Jogs cashed his� A and cleared the suit. Now declarer was stuck the only way he could get to the good spades was to go after clubs. Woofie of course went up with his ace and cashed two diamonds to set the contract and gain 8.90 IMPs.
Woofie and Jogs were the only pair to set 3NT.
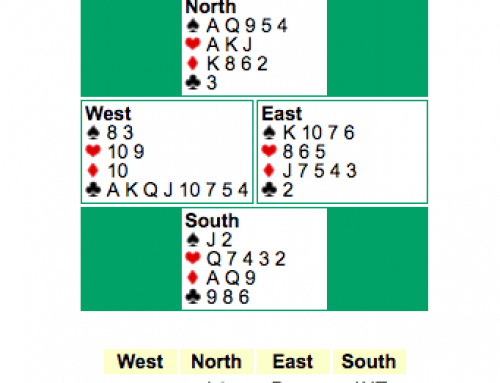
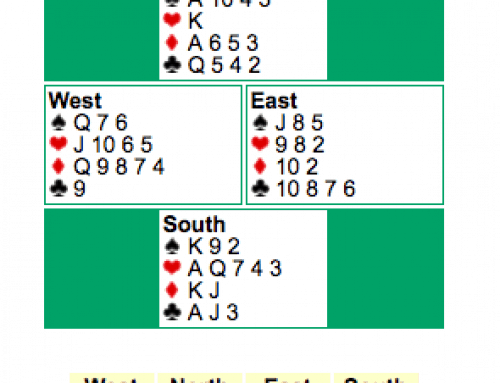
Andy Anderson (Captain) sluffed his� A to set up any entry to dummy, but the defense let him make his notrump game a different way.
Dlr: North Vul: E-W IMPs �
North J 8 7 4 2 5 A 7 6 3 Q 10 4
West Q 6 3 Q 8 3 Q J K J 8 7 2
East 10 9 5 K J 10 10 8 4 2 9 5 3
South A K A 9 7 6 4 2 K 9 5 A 6
West
North
East
South
—
pass
pass
1
pass
1
pass
3NT
pass
pass
pass
Declarer won the� 7 opening lead with dummy’s 10 and went after spades, cashing the ace and king. He crossed to dummy with the� A and led the� J. When East played the 10, Captain knew the suit was breaking, so he discarded his� A, leaving the� Q in dummy as a likely entry.
West did not like his options. The idea of leading his other diamond honor didn’t seem right, and clubs were out of the question. So he tried hearts, leading the 3 to partner’s king, ducked. Declarer ducked the� J as well, but when East tried a third round, Captain won and ignored the good spades. Now he had his game with four hearts, two spades, two diamonds and a club.
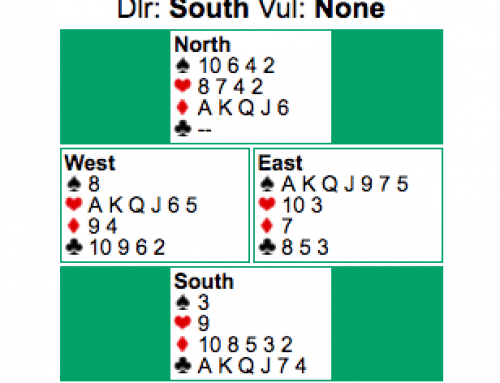
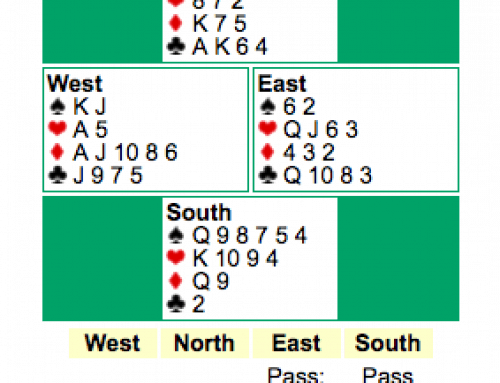
As usual we have a Tuna hand too.
Dlr: East Vul: E-W IMPs �
North — A 10 9 8 4 J 9 8 A K 10 6 4
West Q J 3 K Q 6 2 A K 3 2 7 5
East 9 8 6 4 J 7 Q 10 7 6 5 4 Q
South A K 10 7 5 2 5 3 — J 9 8 3 2
West
North
East
South
—
—
pass
2
2NT
pass
pass
3
pass
6
pass
pass
double
redouble
all
After passing on his first turn over West’s 2NT overcall, Tuna, North, was totally turned on by South’s 3 bid. He not only leaped to the club slam, he redoubled when West doubled. There was nothing to the play. South ruffed the� A opening lead and set up spades easily for 13 tricks — plus 1830 and 16.33 IMPs.
Harold Schogger has just celebrated 40 years of bridge teaching. He opened his bridge club in Hendon London in 1983. Since 1997 he has devoted his time to teaching and directing.He holds the Professional Teachers’ Diploma from the English Bridge Union, and now trains teachers for the EBU. He is also a member of the International Bridge Press Association. Harold is the author of Practice Your Rule of 11 and the ebook Bridge for Winners.Harold has been an OKbridge member since 1997. You can see his valuable blog posts here under the category Bridge Hand Review. Harold is also a Premier Life Master.


 A and cleared the suit. Now declarer was stuck the only way he could get to the good spades was to go after clubs. Woofie of course went up with his ace and cashed two diamonds to set the contract and gain 8.90 IMPs.
 A to set up any entry to dummy, but the defense let him make his notrump game a different way.
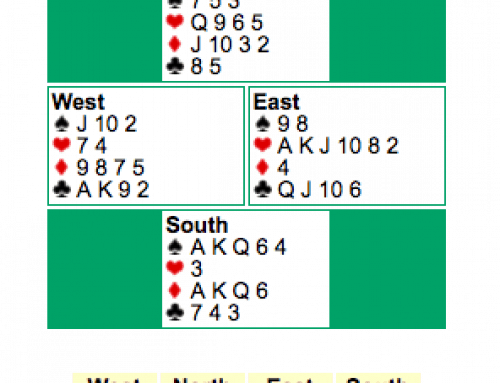
Leave A Comment