This hand was submitted by Malcolm Finn (embee3), who was disappointed that his partner got cold feet and pulled the double of� 3NT.
| |||
|
| ||
| |||
 Q 7 2
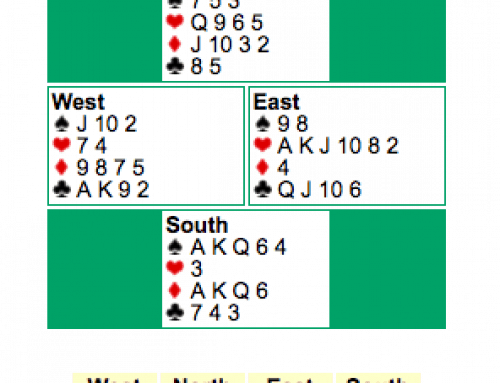
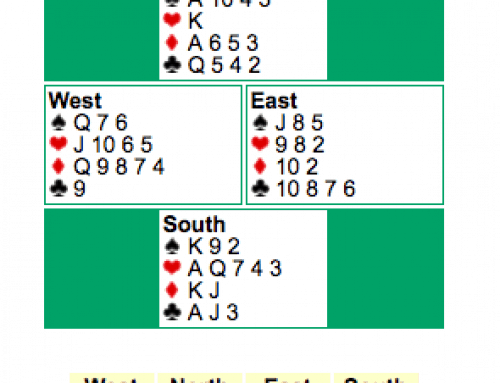
Q 7 2Here is the way the bidding actually went:
| West | North | East | South |
1 | Dbl | Redbl | |
| Pass | 2 | 2 | 3 |
| Pass | 3NT | Dbl | Pass |
| Pass | 4 | All Pass |
This contract went down one trick, losing one spade, two hearts and a club. But look at what would happen if North does not pull the double. Several scenarios are possible.
Most likely East will lead the� ![]() K. Declarer’s only real choice is to duck. If East continues spades, declarer takes his ace, discarding the�
K. Declarer’s only real choice is to duck. If East continues spades, declarer takes his ace, discarding the� ![]() A from dummy. Now he has nine tricks – six diamonds, two hearts and a spade.
A from dummy. Now he has nine tricks – six diamonds, two hearts and a spade.
If East switches to a heart, declarer allows that to run to his queen, cashes the� ![]() A discarding the�
A discarding the� ![]() A and winds up with 12 tricks.
A and winds up with 12 tricks.
If East switches to a diamond, declarer wins and leads the� ![]() Q and the defense is fixed. If East switches to any other suit, declarer is home. So eventually East-West have to take their two club tricks and put declarer back in dummy with a club. After he cashes his good clubs, declarer leads the�
Q and the defense is fixed. If East switches to any other suit, declarer is home. So eventually East-West have to take their two club tricks and put declarer back in dummy with a club. After he cashes his good clubs, declarer leads the� ![]() J. East can’t afford to take this – any return gives declarer his game. But declarer leads the�
J. East can’t afford to take this – any return gives declarer his game. But declarer leads the� ![]() A and another heart, and East is forced to lead a diamond or a spade, giving declarer the rest of the tricks.
A and another heart, and East is forced to lead a diamond or a spade, giving declarer the rest of the tricks.

Leave A Comment