Scoring: IMPs
| ||
| ||
 Q 7 4
Q 7 4�
| East | South | West | North |
1 | Dbl | Pass | 2 |
| Pass | 2 | Pass | 3 |
| Pass | 4 | All Pass |
�
Opening lead:� 2
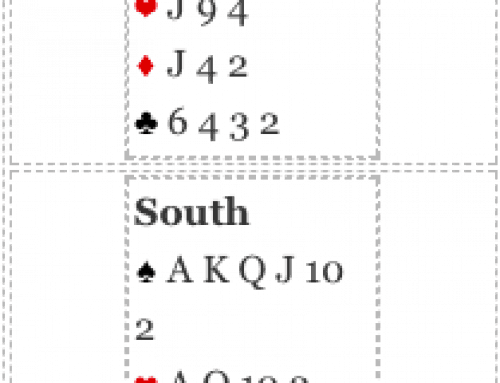
You win the first trick with the queen and follow this up with the ace. Declarer follows with the 4 and 10 and partner plays the 3. Answer the following question before reading on: What do you play at trick three?
| The correct answer is to play a third high heart forcing declarer to ruff which he does with the� 7. Another question: Declarer continues with the� You should duck the trick. Now declarer continues with the� You should duck this trick as well. (explanations coming) Now declarer plays a third high spade. Now what? Take the trick, don’t leave yourself with the blank ace. It is almost NEVER right to do that. The idea when holding four trumps is to try to shorten declarer not only down to your length but to strive for a length advantage! You got off to a good start when you played three rounds of hearts forcing declarer to ruff. When partner followed to the first spade, you knew declarer had a five card spade suit and was reduced to the same trump length as you. Your plan is to force declarer to trump again while you each have the same number of trump, but how? As long as dummy is void in hearts and has spades, you cannot force declarer to trump a heart. Declarer will simply trump in dummy retaining the longer spade length in the closed hand, the same trump length as you have and will be able to draw your remaining trumps. What you have to do is win the THIRD round of spades, the round that exhausts dummy. Now when you play a heart, declarer has to trump in his own hand with his last trump. You now have the master trump plus a good heart. Declarer has lost control of the hand and is destined to go down two as your fifth heart and your remaining spade are both winners. Yes, declarer can (and should) limit his losses to down one. Once declarer sees you have four spades and five hearts, and once you have smartly ducked two rounds of spades, declarer simply plays minor suit winners and lets you trump. Now you get two spades and two hearts, but declarer has not lost control of the hand and does not lose that extra heart trick. For those of you who were tempted to return a diamond instead of continuing hearts hoping partner has the king, there are a number of reasons why this is not a good play. The most important is that you have the hand defeated regardless. Once declarer has five spades, he cannot draw trumps as you will win the third round and force him with a heart, so he will be compelled to play minor suit winners. If he does that, you will trump the third round of either clubs or diamonds and will take two spades and two hearts. Declarer now has one more trump than you do. Also, if partner has the� South has bid very strongly. Making a takeout double with a doubleton in the opener’s suit and then bidding a suit generally shows 16-19 HCP. With specifically 5-3-3-2 distribution, the worst distribution possible, declarer figures to have 17-19 HCP. With more aggressive patterns including 5-4 either way in the unbid majors, or a singleton in the opener’s minor with 5-4 either way in the majors, doubling and then bidding a suit can show as few as 15 HCP. As a general rule, when the doubler bids a new suit facing a minimum response, place the doubler with at least 16 HCP. Let’s practice. You have 13 HCP, dummy has 9 for 22 and declarer 16 for 38. That leaves partner with at most 2 HCP, either a queen or two jacks. Well partner can’t have a minor suit queen, you can see them both. He can’t have the� What about this title, Trumps and Lumps? It refers to a player on lead with four trumps. It is usually right to lead one’s longest side suit (the ‘lump’) in an effort to shorten declarer just as you did on this hand. Remember this: ‘With four trump, lead from a lump’. I must confess I read an article not long ago which recommended leading a singleton in an unbid suit with four trumps rather than the long side suit. However the trumps must not be so strong that a ruff would cost you a trump trick. For example with J10xx, QJ9x or KJ10x there is no compelling need to lead a singleton. Dlr: East Vul: E-W Scoring: IMPs
| ||||||||||||||||||||||||||

Leave A Comment