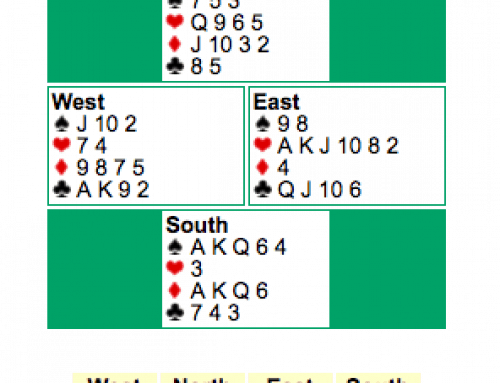
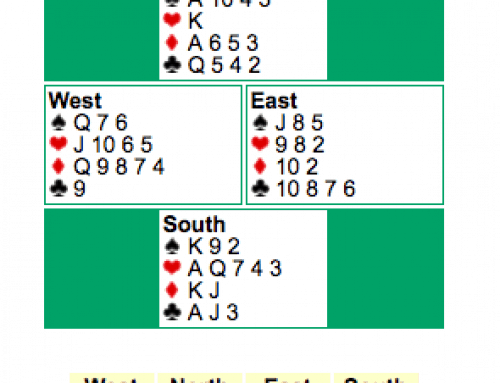
Martine Lacroix of Montreal, sitting West, scored a plus on this deal when declarer took a losing heart defense. The deal intrigued him – he wondered if anyone made the grand slam without benefit of a defensive mistake.
| |||
|
| ||
| |||
 A Q 8 6
| West | North | East | South |
| Pass | 2NT | ||
| Pass | 3 | Pass | 3 |
| Pass | 7NT | All Pass |
He discovered that only one player — Roy Baughman (royman), found the correct line — a Vienna Coup.
Roy won the opening spade lead, cashed dummy’s high clubs and crossed back to his hand with the� ![]() K. He then made the key play – he cashed the�
K. He then made the key play – he cashed the� ![]() A. Having set the stage, he went back to dummy to cash the remaining diamonds. On the last diamond, he discarded his small heart, but West was squeezed. West had to keep three spades to cover declarer’s spades, and he had to keep the�
A. Having set the stage, he went back to dummy to cash the remaining diamonds. On the last diamond, he discarded his small heart, but West was squeezed. West had to keep three spades to cover declarer’s spades, and he had to keep the� ![]() K because dummy still had the queen. But he had to throw something away. A neat plus +2220 for Roy.
K because dummy still had the queen. But he had to throw something away. A neat plus +2220 for Roy.
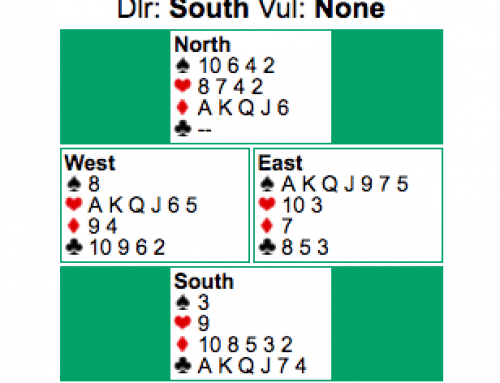
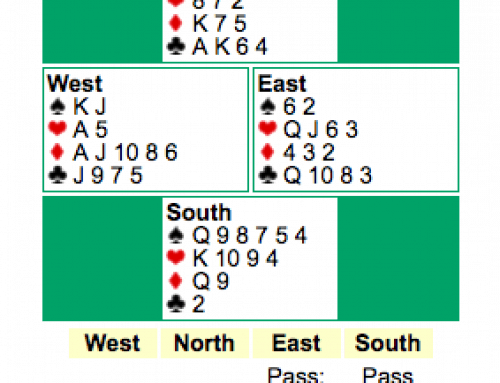
On our next deal, Tinmarin knew from the bidding that his side had 10 spades, but he made the unusual decision of bidding 3NT instead of 4![]() . It’s easier to take nine tricks than ten, so they say.
. It’s easier to take nine tricks than ten, so they say.
| |||
|
| ||
| |||
| West | North | East | South |
| Pass | Pass | 1NT | |
| Pass | 2 * * | Pass | 3 |
| Pass | 3NT | All pass | |
| * Transfer to spades | |||
Tinmarin was right about a 4![]() contract. There is little doubt that West would have started with a high diamond, and the defenders would wind up with four tricks for a one-trick set.
contract. There is little doubt that West would have started with a high diamond, and the defenders would wind up with four tricks for a one-trick set.
Against 3NT, it’s not all that easy for West to find the diamond lead. He actually led a club, and dummy’s queen held. Declarer drove out the� ![]() A. When East returned a club, declarer ducked and then won the third round of the suit.
A. When East returned a club, declarer ducked and then won the third round of the suit.
On the run of the spades, West came down to� ![]() -K10 and�
-K10 and� ![]() -AK while declarer kept�
-AK while declarer kept� ![]() -AJ and�
-AJ and� ![]() -QJ. When declarer called for a diamond, West was able to take his top diamonds but then was forced to lead into declarer’s heart tenace. Nine tricks and 10.39 IMPs. Right? Yes, but . . .
-QJ. When declarer called for a diamond, West was able to take his top diamonds but then was forced to lead into declarer’s heart tenace. Nine tricks and 10.39 IMPs. Right? Yes, but . . .
But maybe declarer should have been beaten on this line of play. West should read the situation when South discards a diamond on the last spade. If declarer has the heart tenace, then he is down to two diamonds, so all West has to do is keep three diamonds and throw away a heart.
If instead declarer sluffs a heart, he has bared his� ![]() A. So West must bare his�
A. So West must bare his� ![]() K and keep three diamonds. When West wins the first diamond, he returns a heart, end-playing declarer in diamonds.
K and keep three diamonds. When West wins the first diamond, he returns a heart, end-playing declarer in diamonds.
Now it’s declarer’s turn to be alert. He knows it’s important not to leave West with an exit card, so he should lead a heart to his bare ace at trick 10. That drops West’s king. Now declarer can lead the� ![]() Q and West is fixed. He can take his two diamond tricks, but then he has to give declarer the last trick with the�
Q and West is fixed. He can take his two diamond tricks, but then he has to give declarer the last trick with the� ![]() J.
J.
Leave A Comment