Bridge tips by Eddie Kantar.
Opening lead:�  2 After you win the� A at trick one, South following with the 7, what do you return?
 2 After you win the� A at trick one, South following with the 7, what do you return?
Dlr: East Vul: Both
Scoring: MPs
Scoring: MPs
| ||
| ||
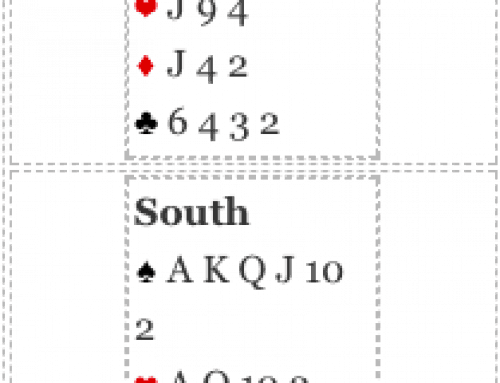
 A Q 10 8 6
 5 4 3
5 4 3�
| East | South | West | North |
| Pass | 1 | Pass | 2 |
| Dbl | 4 | All Pass |
�
| Defending against a suit contract is like declaring a hand in reverse. When you are declarer what you try to do is get rid of losers? One way is to take a finesse or two, but what are the others? There are two main ways of getting rid of losers: (1) Trump them in dummy when dummy has shortness in a suit and you have greater length in that suit (hearts). (2) Try to set up a long suit (diamonds) and get rid of losers on established cards in that suit.If losers cannot be avoided by using any of those methods, those losers will remain losers. THEY CANNOT GET AWAY.Now back to the defense. You know what the declarer will try to do and you have to consider your countermeasures. You know that diamonds cannot be established on this hand so no side losers can be discarded on diamonds. In other words, if declarer has any club losers, THEY CANNOT GET AWAY. Translation. It is not necessary to attack clubs. Whatever club losers declarer has will be there later. What about ruffing losers in the dummy? Declarer is likely to have three hearts and there is some chance of stopping a ruff in dummy if partner has a quick trump entry and the� K. It must be right to shift to a trump.If the diamond suit was more threatening, it would be necessary to attack clubs at trick two because club losers could get away on diamonds. The key to many defenses is to know just how threatening the long suit in dummy is. Entry considerations are paramount. It does declarer no good to set up a long suit for discards if declarer cannot get to dummy to use it.If you can teach yourself to think this way, you will be a superior defender.More thoughts on this hand.When West sees East shift to a trump looking at those strong diamonds in dummy, East is telling West not to worry about diamonds. If East were worried about diamonds, he would have shifted to a club.East’s passed hand takeout double shows 9-11 HCP with shortness in the opponent’s suit; the shorter the better. It is an exception to make a passed hand takeout double with three cards in the major suit the opponents are bidding.An opening heart lead from the king figures to be safe with the West hand as East surely has heart support on the bidding. The trump switch at trick two defeats the contract. Assuming South ducks, West wins the king and exits a trump. When West gets in with a heart, a third trump play ends declarer’s chances of ruffing a heart. Once West turns up with the major suit kings, the diamond finesse is sure to fail so South might as well take the club finesse which works for down one. Declarer loses three hearts and a spade. Dlr: East Vul: Both Scoring: MPs
| ||||||||||||||||||||||

Leave A Comment