Scoring:� MPs
| ||
| ||
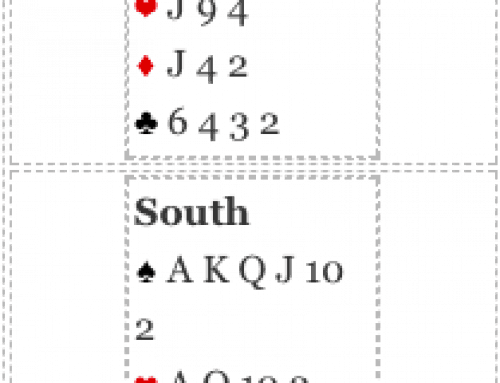
| South | West | North | East |
1 | Pass | 2 (1) (1) | Pass |
2 | Pass | 2NT | Pass |
| 3 | Pass | 4 | All Pass |
Not played as a game force. Playing ‘two over one’ North would probably opt to respond 1NT, forcing, then rebid 2NT over 2 and finally raise 3 to 4. All roads lead to Rome.
Opening lead:�  A (Ace from AK). You start a high-low and partner continues with the ace and eight of clubs which you trump, declarer following with the three, four, and jack. What now?
Declarer has shown 5-5 in the majors and has turned up with three clubs. Ergo, declarer has a diamond void so don’t even think of playing the� A. Both declarer and partner have five spades. There is a good chance that declarer may have to trump three spades in dummy (partner returned his higher remaining club indicating spade strength) so you should cut down dummy’s ruffing power by smartly switching to a trump at trick four.
Notice without the trump shift, declarer has an easy crossruff for 10 tricks… providing he cashes the AK of spades before starting the crossruff.
Scoring:� MPs
| |||
|
| ||
| |||
| South | West | North | East |
| 1 | Pass | 2(1) | Pass |
| 2 | Pass | 2NT | Pass |
| 3 | Pass | 4 | All Pass |

Leave A Comment