I’m a big believer in showing support for partner’s suit. Suppose you hold
J 7 6 A J 7 K Q 9 6 A J 5
You open 1NT, and your partner responds 3, natural and forcing. Some players would persist with 3NT because of the balanced distribution and mediocre spades. A disciplined player raises to 4, which is what his partner wants him to do with three-card or better support.
In a Bermuda Bowl many years ago, a U.S. pair held these cards:
West A 4 A 6 4 A Q 9 7 3 10 8 2
East Q J 7 2 10 K J 6 K Q 7 6
West
East
1
2
2NT
3
3NT
pass
The auction was a sad display. West refused to bid 4 over 3 even though he had a fine hand for play at clubs. East never showed his diamond support — perhaps 3 over 2NT wouldn’t have been forcing, but then East could have tried 4 over 3NT.
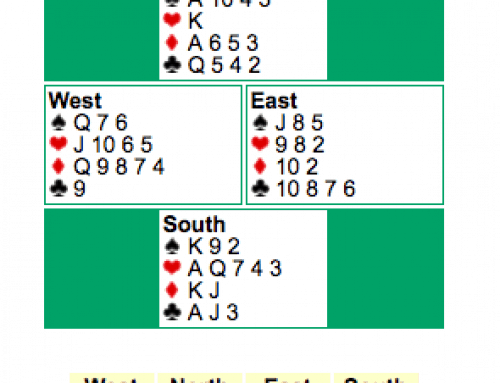
In spite of all that, showing support or taking a preference can be a doubtful action. Compare these two auctions:
West
East
1
1
2
2
West
East
1
1
2
3
In the first auction, East has bid two suits and invites West to take a spade preference. If West holds
West Q 6 7 6 A Q 8 5 3 A K 6 5
he can bid 2. But in the second auction, East has supported West’s first suit and is less interested in hearing a preference. Therefore, a 3 bid should show better support. West should bid 4 or 5.
:As West you hold
West A 9 6 3 J 7 4 K Q 9 4 K 6
West
East
1
1
1
1NT
Pass, don’t bid 2. You can’t bid three times with this minimum hand. If your hand were
West A 9 6 3 K Q 3 K 9 6 4 7 6
you could make a case for raising East’s 1 response to 2.
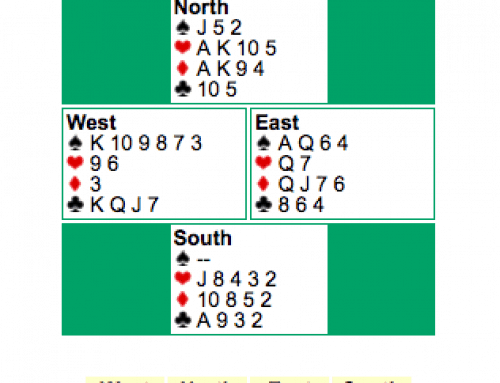
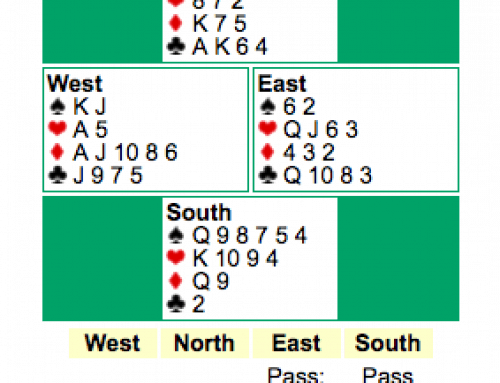
An OKbridge member kindly sent me the deal below from an expert game on OKbridge. North had made a questionable decision in the auction.
Dlr: South Vul: E-W
North A 8 5 Q 10 2 K 9 8 2 K Q 3
West J 9 2 A 8 5 4 3 A 4 10 9 4
East 10 7 4 K J 6 6 5 3 A J 7 6
South K Q 6 3 9 7 Q J 10 7 8 5 2
West
North
East
South
—
—
—
pass
pass
1
pass
1
pass
1NT
pass
2
pass
2
all pass
North had an excuse for his 2 bid — the game was matchpoints. Even so, he hadn’t been asked to take a preference. 2 rated to be a safer partial. A plus score in a delicate partscore deal can be worth a lot of matchpoints.
Against 2, West led the A, a happy choice for him, and continued hearts. South ruffed the third heart and led the Q. West took the ace and led a fourth heart. Declarer ruffed in dummy with the 8, East uppercut with the 10, and South put herself in a hopeless position when she overruffed with the queen.
South next led a club to the queen, and East ducked. After a diamond back to the jack, South led a trump to the ace and perversely tried another diamond. West ruffed and persisted with his last heart, ruffed in dummy with the 5. East overruffed again, this time with the 7, and South’s king won her last trick. Down two, +100 to East-West.
South could make 2 by pitching on the fourth heart instead of overruffing East. But West could always beat the contract by ducking the first diamond, threatening declarer with a diamond ruff. North might have done well to pass 2, accepting a mundane +90.
Frank Stewart is one of the world's most prolific bridge journalists. He won many tournament events before devoting himself to writing. Frank has published hundreds of magazine and on-line articles. He has written 24 books, among them "Becoming an Expert," "Play Bridge With Me," "Who Has the Queen?" and most recently "Keys to Winning Bridge." In 2014, Frank Stewart received the International Bridge Press Association's Alan Truscott Award. He has been the senior analyst for ACBL-wide Charity and International Fund events since 1980. Frank and his wife, Charlotte, a pediatric speech pathologist, live in Fayette AL. They have a 17-year-old daughter.
 , natural and forcing. Some players would persist with 3NT because of the balanced distribution and mediocre spades. A disciplined player raises to 4


Leave A Comment