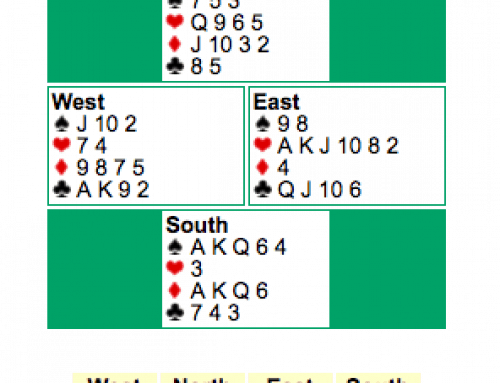
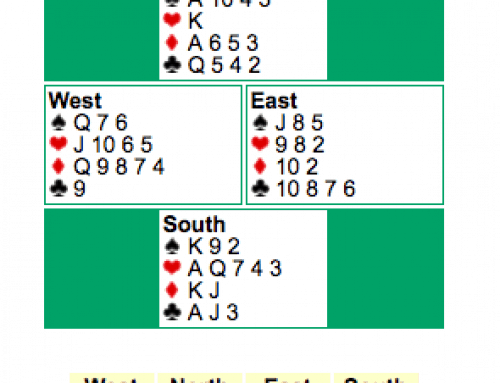
Vida, sitting East, realized that the K was probably sitting over him based on the bidding. But he saw a ploy that would make it as difficult as possible for North, the declarer. This was the deal and bidding:
North  Q 9 2  A Q 10 7  10 7  Q J 5 2
West  J 10 7  6 5  6 5 4  A K 8 6 3
East  8 6 4  J 9 8  A Q J 9 8  9 7
South  A K 5 3  K 4 3 2  K 3 2  10 4
West
North
East
South
1
Pass
1
Pass
2
Pass
2NT
Pass
4
All pass
Vida led the Q! Would you cover? Declarer didn’t – he decided to play West to have the doubleton A. Vida continued with the A, and there was no way for declarer to avoid two club losers for down one. Congratulations, Vida, for an imaginative and effective lead.
(Editor’s note: Would it hurt for declarer to play the K at trick one? If West holds the ace, declarer will be down one, just as he was by not putting up the king. Sure, the chances that East has the A are minimal, but apparently there is nothing to lose and much to gain by playing the king. None of this takes anything from Vida’s great lead. It’s always good to force declarer to make a decision before he has the information he needs.)
Harold Schogger has just celebrated 40 years of bridge teaching. He opened his bridge club in Hendon London in 1983. Since 1997 he has devoted his time to teaching and directing.He holds the Professional Teachers’ Diploma from the English Bridge Union, and now trains teachers for the EBU. He is also a member of the International Bridge Press Association. Harold is the author of Practice Your Rule of 11 and the ebook Bridge for Winners.Harold has been an OKbridge member since 1997. You can see his valuable blog posts here under the category Bridge Hand Review. Harold is also a Premier Life Master.
Leave A Comment