Dlr: West Vul: Both
Scoring: IMPs
Scoring: IMPs
| ||
| ||
�
| West | North | East | South |
3 | Dbl | Pass | 6 |
| All Pass |
�
Opening lead:� K
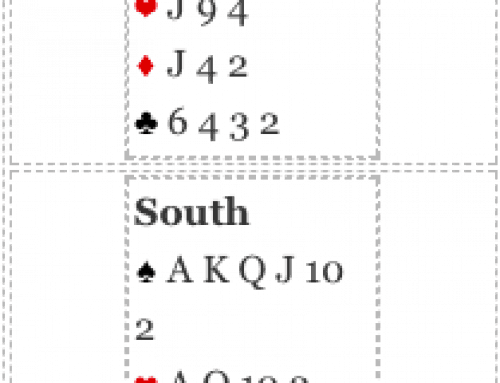
6 looks reasonable with your hand, now all you have to do is make it. East follows with the� 2 and spades are 1-1. Plan the play.
It’s too much to hope for that West has the�  A. West is the the preemptive bidder. In any case, you have a great chance of making the hand if East has the� A. A. West is the the preemptive bidder. In any case, you have a great chance of making the hand if East has the� A.Consider West’s distribution. West figures to have 7 clubs from the bidding and East’s play at trick one and is known to have one spade leaving West with five red cards. If East has four hearts and a diamond, he might have led a singleton diamond and preemptive bidders seldom have four cards in an unbid major anyway. West figures to have two hearts and three diamonds or vice versa. All this is great news for you. See why?After drawing trumps, play your three top hearts, discarding DIAMONDS. Continue with the�  9. East should be playing the ten or jack on this as West is unlikely to have any more hearts. When East covers the� 9, discard your last diamond. Assuming East wins the trick, and assuming East doesn’t have any more clubs, East is in big trouble. 9. East should be playing the ten or jack on this as West is unlikely to have any more hearts. When East covers the� 9, discard your last diamond. Assuming East wins the trick, and assuming East doesn’t have any more clubs, East is in big trouble.If East leads a heart, a ruff and a sluff, discard your club and ruff in dummy. You remain with all spades. If East lays down the� Dlr: West Vul: Both Scoring: IMPs
| ||||||||||||||||||||||

Leave A Comment